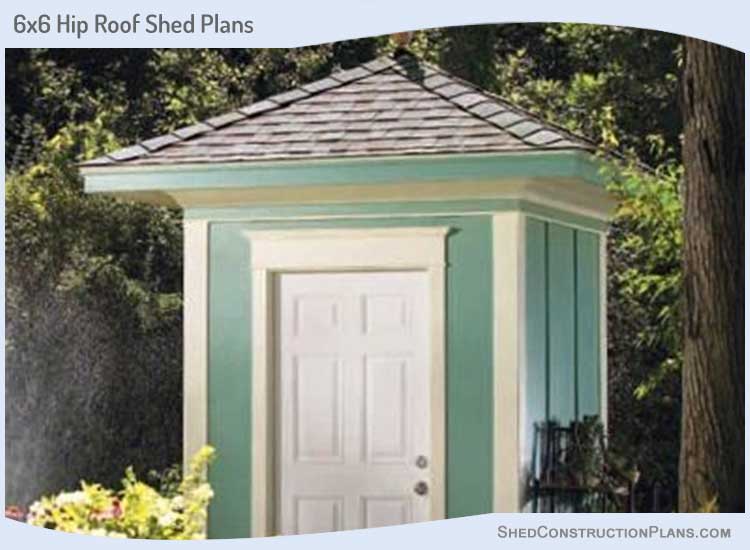
These 6×6 tool shed plans and blueprints will show you how to build a compact tool shed in your yard.
If you need a safe place for storing all your gardening supplies and equipment but don’t have enough space in your backyard then building a shed can be the best choice for your storage needs.
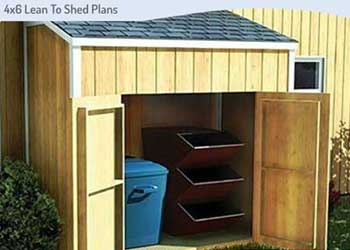
This shed has a vintage Georgian look and also easily fits into narrow spaces due to its small 6×6 floor space. It will also enhance the beauty of any garden or yard.
The shed has ample room in the front for setting up a potting bench and putting up shelves. The wide doors at backside of the shed provide easy access to contents of entire shed and also allow you to use it as a locker for your tools.
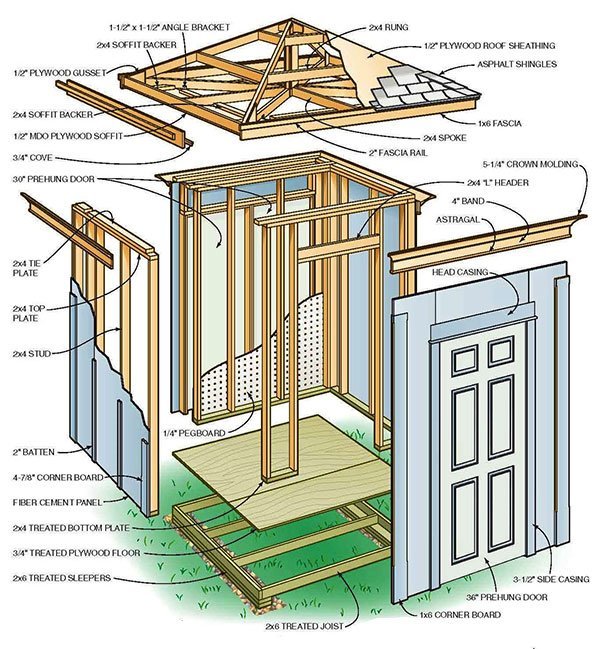
Make sure to use weather-resistant materials for trim and siding. The different components of the shed can be built separately and assembled on site.
For this project you will need a router, a miter saw, a table saw, a circular saw and a drill. Use a nailer powered by compressed air to install the trims better and faster.
This project will take about 2 days to build and one day for painting.
Check with your local construction office to confirm if you need any special permit for constructing a shed on your property.
If the ground is sloping you may need to level it first with some gravel or concrete.
You would need to order the panels and trim boards for the shed from your local lumber yard in advance to make sure you have all the necessary components by the time you start construction.
6×6 Garden Tool Shed Framing Plans For Making The Walls
You should buy the pre-built doors prior to starting the project as this will help you calculate the size of the opening required in the walls.
Current plans assume that the door is about 36 inches wide and needs an opening of 38 inch by 82.5 inches in the wall.
The larger gap in the back wall of the shed will comfortably fit 2 thirty inch wide pre-built doors.
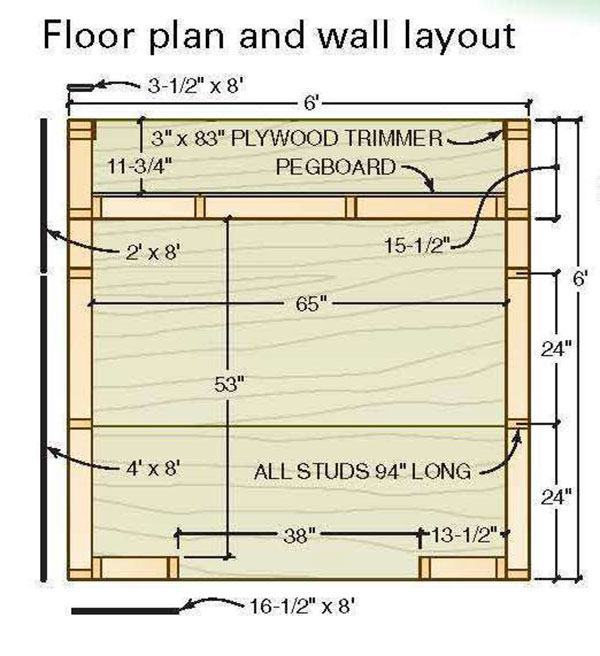
- Build the 6×6 floor frame using pressure treated 2×6 boards as shown in the floor plan.
- Use screws or nails that are corrosion resistant to fasten the boards with each other.
- Create the lower plates for the walls using 2x4s made from treated lumber.
- Cut out the plates according the size shown in the diagram.
- You will need to construct twenty 94 inch wall studs for assembling the four walls.
- The header that will be fastened over the back doors will be about 14 inch by 65 inch in size.
- Verify that each wall frame and the floor frame are accurately square by measuring the diagonals.
- Secure pressure treated plywood panels (0.75 inch thick) to the floor frame, using 1.5 inch screws.
- Secure the pegboard to inner peg board wall.
- Cover the side and front walls with cement panels by nailing them to the frame.
- Make sure that the panels are parallel to the lower plate and not the upper plate since the wall frames are about an inch taller than the panels.
- The framing of the side walls are identical to each other but just ensure that the two sides look like mirror images of each other.
- The panels on the wall at front overhang the wall frame by about 3 inches.
Blueprints For Constructing Roof Frame

Usually a hip roof consists of several angular cuts and calculations for building and fitting together the different components of the roof.
But this shed features a roof that is pretty simple to build.
All the roof components are built on the ground and so they can be finished very fast.
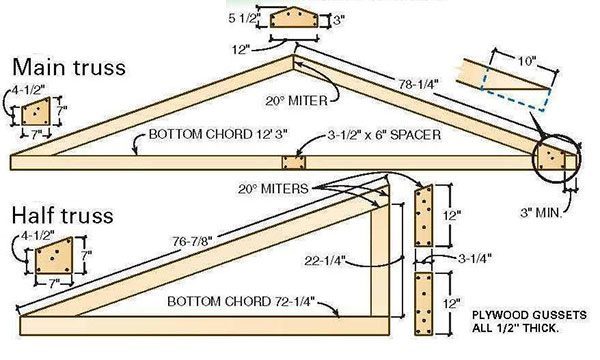
- Begin by constructing the main truss and the 2 half trusses as shown in the roof blueprints.
- Make sure the 2x4s you use for building the trusses are exactly straight.
- Shave of any curved edges as necessary to ensure all the boards have perfectly straight edges.
- Refer to the roof diagram to ascertain the angles and lengths needed for crafting the gussets and trusses.
- The gussets will ensure that the trusses are held together securely and make the joints strong even if the angles are not perfectly cut.
- Connect 3 trusses using 2 hub gussets as shown in the diagram. Use the plywood remaining from the floor construction for this.
- There are 45 degree bevel cuts at both ends of the rungs that go amongst the trusses.
- These bevel cuts can be made using a miter saw or by leaning the shoe of a circular saw.
- Verify that the four rungs of the roof are of the same size to ensure that the roof frame is perfectly square.
- Craft them to a length of 103 inches each and the test fit them to ensure are all of the same size.
- They must all fit accurately among the trusses.
- Once the bottom rungs are in position, attach the spokes.
- Every spoke bears a double bevel cut at one end. Create a 45 degree bevel starting from one side and then turn the 2×4 over and slice from the other side.
- This will create a 90 degree tip that will accommodate in the spot where the half-truss and main truss come together.
- Finish the roof frame by connecting the top rungs.
Blueprints For Building Floor Frame
- The foundation of the shed is built using pressure treated 2×6 boards laid on a layer of gravel.
- Excavate two trenches parallel to each other with about 6 feet separation. Each trench will be 10 inch wide and 6 inch deep.
- These trenches will run parallel to the back and front walls of the shed.
- Pack each trench with gravel.
- Place the six feet long sleeper boards on the gravel. Determine which boards are not level by using a spirit level.
- Make these sleepers level by moving the gravel underneath them to decrease or increase their height as needed.
- If the ground slopes too steeply then you can nail an extra board over the low lying boards to make them level with the higher boards.
- Place the floor frame over the sleepers such that the joists run across the gap among the sleepers.
- Fasten each corner of the floor frame to the sleepers using 3 inch screws.
- Use a friend’s help to put up the walls.
- Attach one of the side walls in position and secure it to the floor using screws at every 2 feet,
- Lay the lower plate parallel to the outer boundary of the floor.
- Ensure that the rear wall is plumb using a level and then support it with a 2×4.
- Put the front wall in place and secure it to the floor using wood screws.
- Secure the front and side walls with each other by driving screws into the front sheathing that overhangs.
- Now attach the wall made with pegboard and then the remaining side wall. Lastly attach the back header wall.
- Nail the tie plates on the walls after checking that all walls are perfectly straight.
- Raise the roof frame on to the wall frames using a ramp constructed from a couple of 16 feet long 2x4s and the help of two friends.
- Fasten the pieces of wood for the ramp using 3 inch screws and support them in the center using a single 2×4 connected to both boards of the ramp.
- Gently slide the roof from onto the ramp and up on to the wall frame.
- Align the roof frame such that all lower rungs at the same space from the walls and their edges are level with the walls.
- Secure the roof frame using angle brackets and attach the soffit brackets. Then sheath the roof using 0.5 inch thick plywood.
Steps For Adding Trim And Fascia
- The trim boards are made of composite material which is much more weather resistant than wood.
- Molding made of pine is used in sections of the shed which are protected from rain and sun.
- The composite boards used are 0.625 inches thick and are of same width as regular wooden boards. Some boards may need to altered with a router for better fitting.
- Three types of router bits are needed for crafting the trim boards. One 0.25 inch round over, one 0.375 inch round over and one 0.375 inch cove bit.
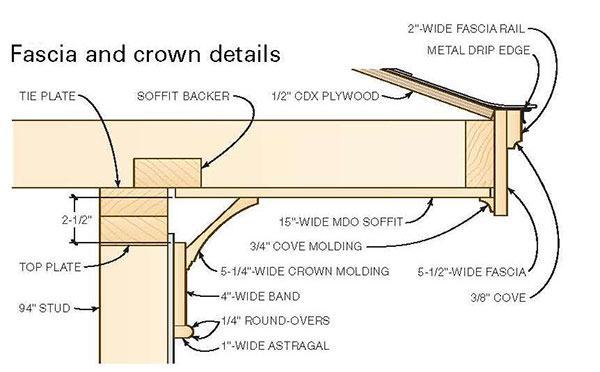
- First attach the fascia and fascia rails and then shingle the roof using asphalt shingles.
- Connect metal drip edges over the fascia.
- Make sure to butt the composite tri at the corners and don’t miter them. Joints that are mitered tend to come apart as time passes.
- Half inch thick medium density overlay is used as the material for soffits. Fiber cement boards or plywood can also be used for the soffit boards.
- Use a 5.25 inch thick cove profile for the crown molding.
- The edges of the panels are hidden by corner boards and the joints are hidden using 2 inch wide battens nailed on to the studs of each side wall.
Schematics For Assembling Door Frame
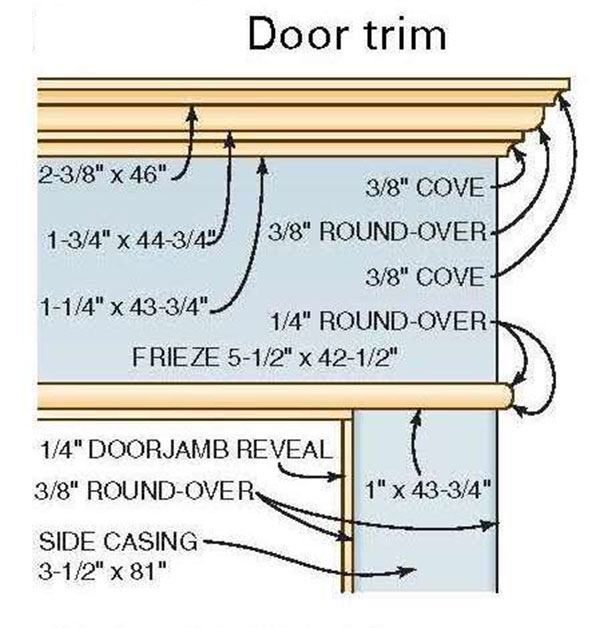
The front door is a standard 6 panel door trimmed using an intricate casing.
- Cut out the trim material to 3.5 inch wide and rout all boundaries with a round over bit.
- Attach the side casings such that the overshoot the door jamb opening by about 0.25 inch.
- Refer to the diagrams to understand how to put together the head casing that will rest over the side casings.
- The 5 sections that constitute the head casing can also be bigger or smaller than the dimensions shown in the diagrams.
- To ascertain the accurate size, take a measurement over the side casing from the outer boundary of one till the outer boundary of the other. In our case it was about 42.5 inches.
- To create the tool holder behind the shed, two simple pre-fabricated 30 inch steel doors are used. One door has a right swing and other has a left swing.
- Remove the pre-installed trim from the doors and fasten the jams together using screws to build a double door.
- Screw a 4 inch wide piece of 0.5 inch thick plywood over top of the jambs to further strengthen the structure.
- Attach the double door in reverse such that it swings outside rather than inside.
- The boards on the back of the shed at the corners behave like the casing for the door so the have to be installed only after the doors have been secured to the shed.
- Attach a 1×6 board over the doors to finish the casing of the back door.
Adding Final Touches To Your Tool Shed
- Cover the doors with primer and caulk.
- Prime any cut ends and routed profiles of the trim boards using acrylic primer.
- Also prime the lower ends of the battens and corner boards to prevent them from absorbing water.
- After priming the wooden boards, some of the fibers in the boards will get raised and make the surface of the boards rough.
- Sand the boards using sandpaper gently to remove these raised fibers.
- Cover all nail holes and gaps between trims using acrylic caulk. Do the same for the joints above the doors.
- Finally paint the entire shed using two coats of acrylic paint.