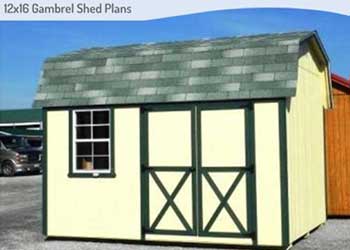
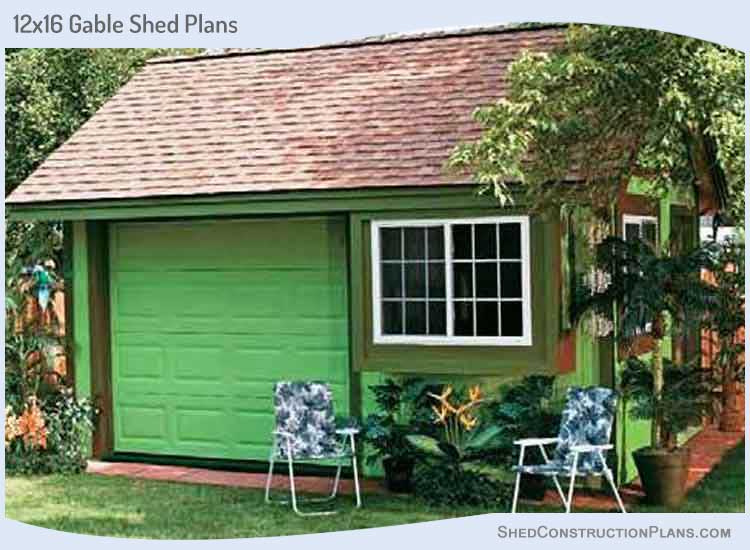
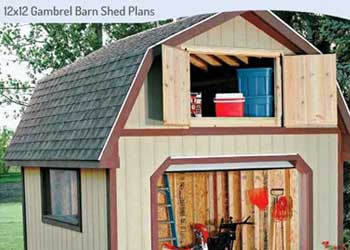
You can build a spacious gable shed on your property by using these 12×16 storage shed plans with loft blueprints in just a few days.
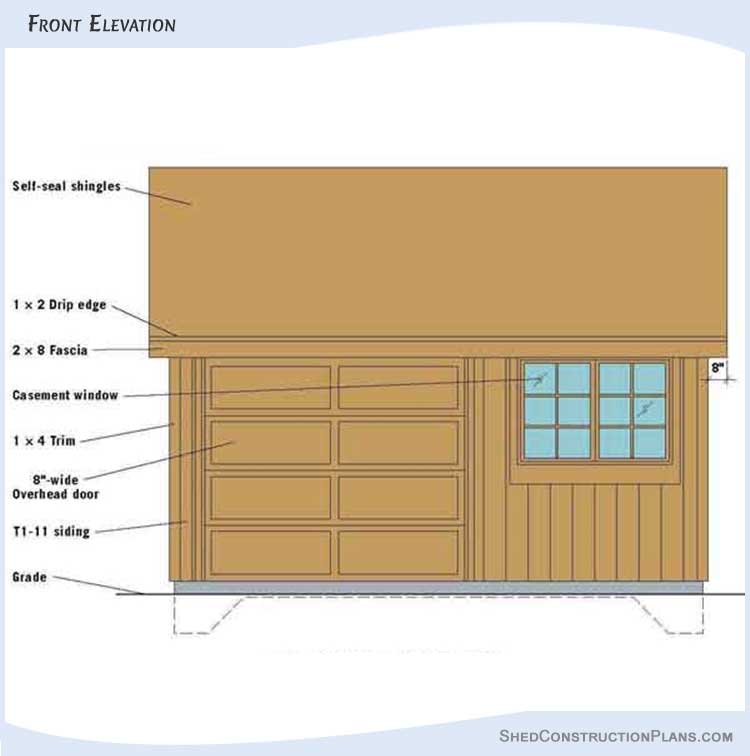
These gable shed blueprints will help you design an outbuilding with a wide garage door that makes it easy to move large equipment in and out of the shed.
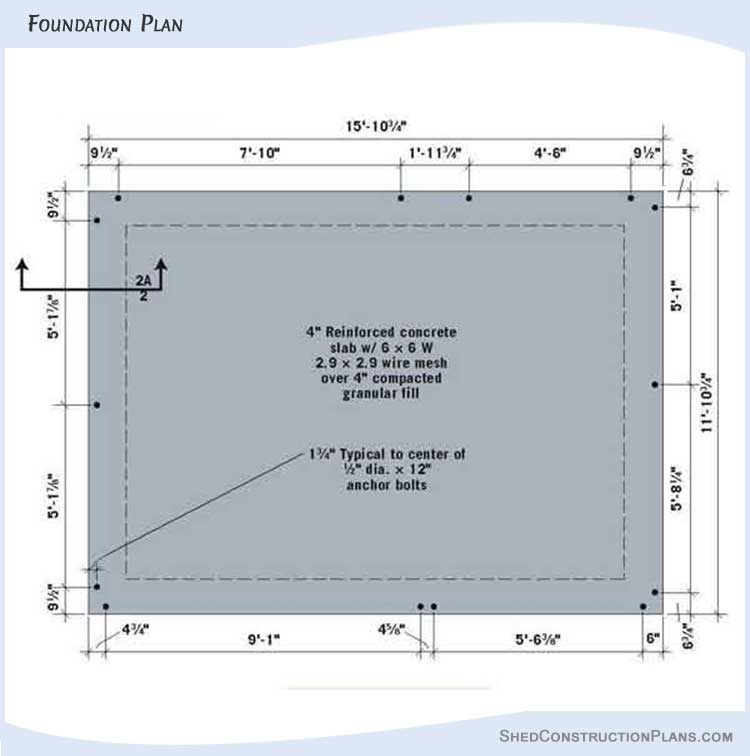
The solid concrete foundation is suitable for storing heavy items, and the box bay window allows ample sunlight into the shed.
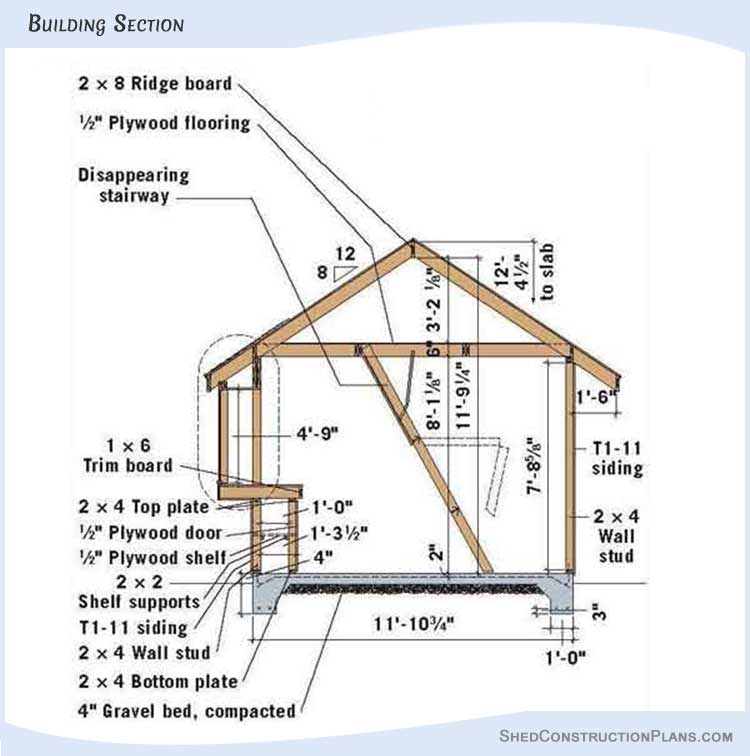
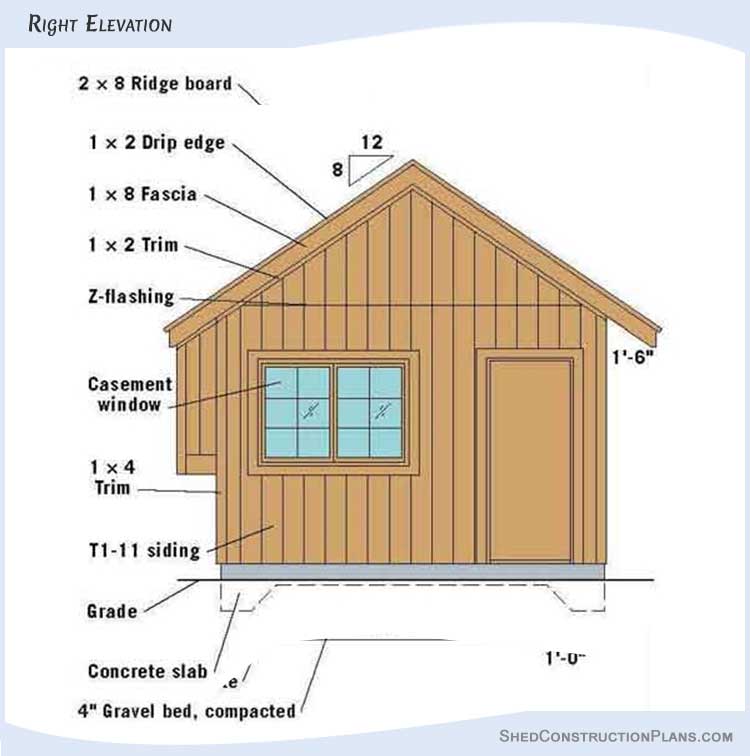
The loft below the roof has over 3 feet of headroom underneath the roof apex.
Gable Storage Shed Plans 12×16 With Loft Building Layout
12×16 Storage Shed Plans For Floor Framing And Foundation Design
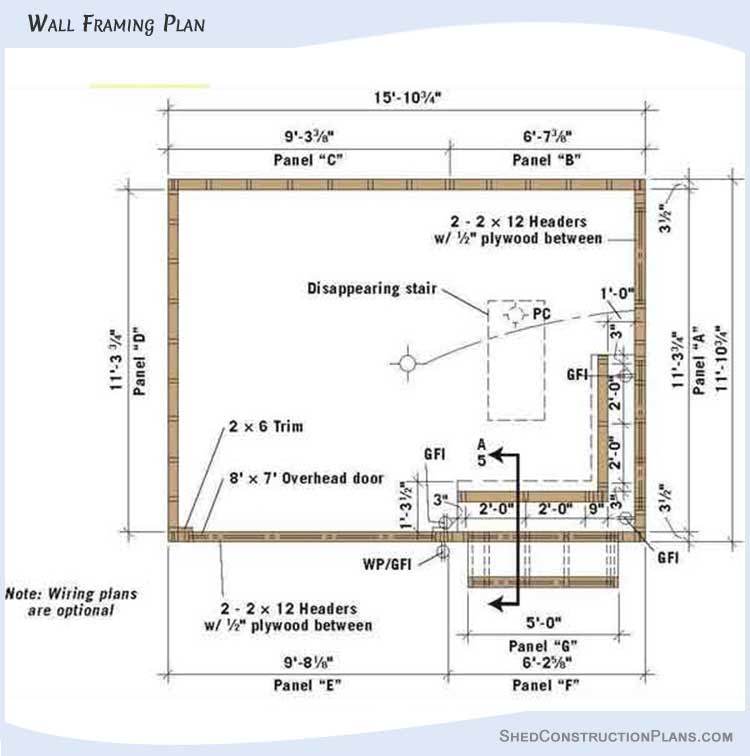
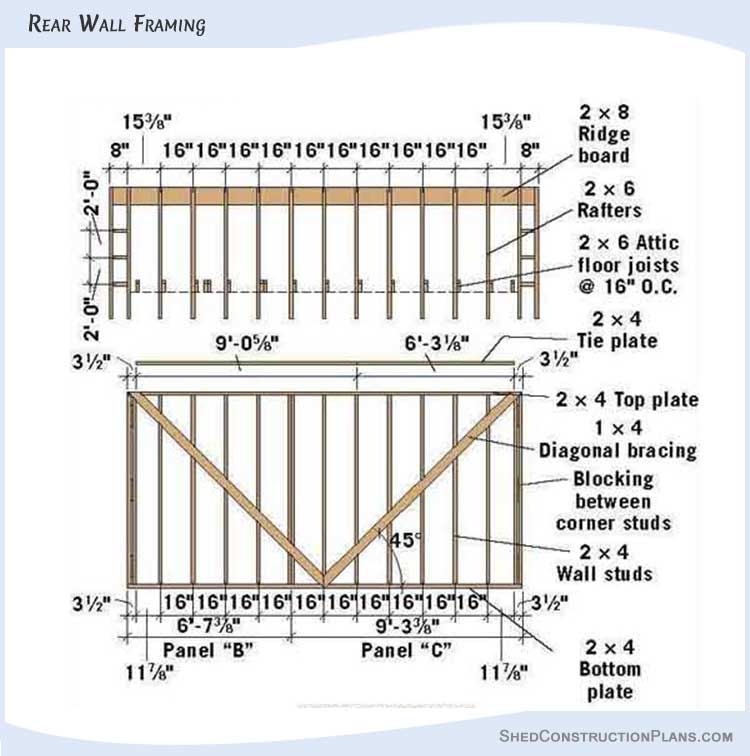
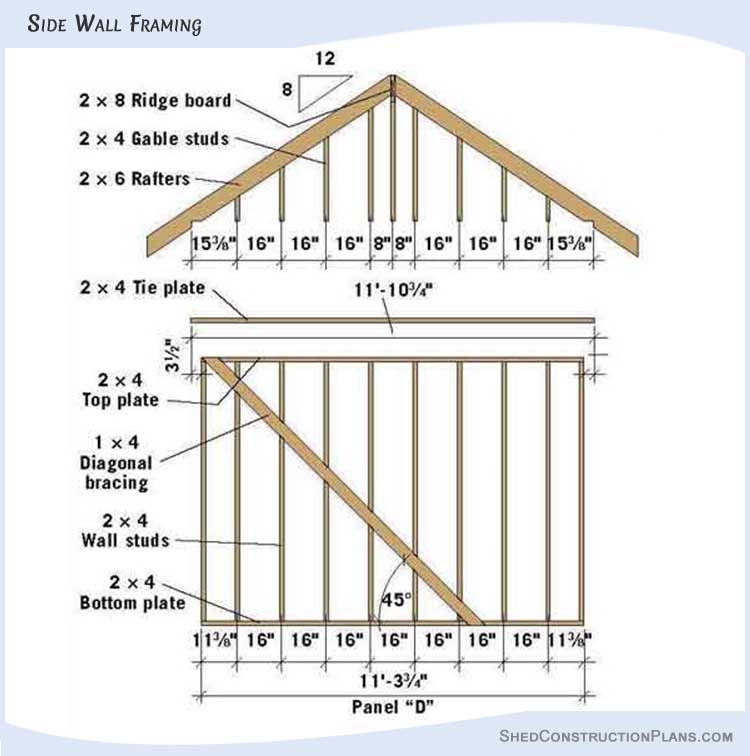
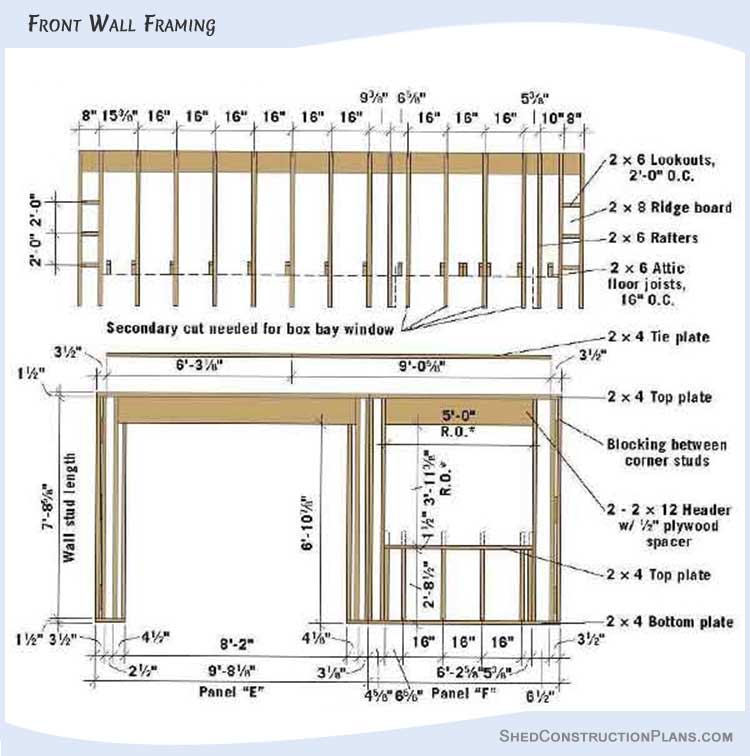
Storage Shed Blueprints For Designing Wall Framing
Schematics For Making Windows & Doors

Step-By-Step Building Instructions
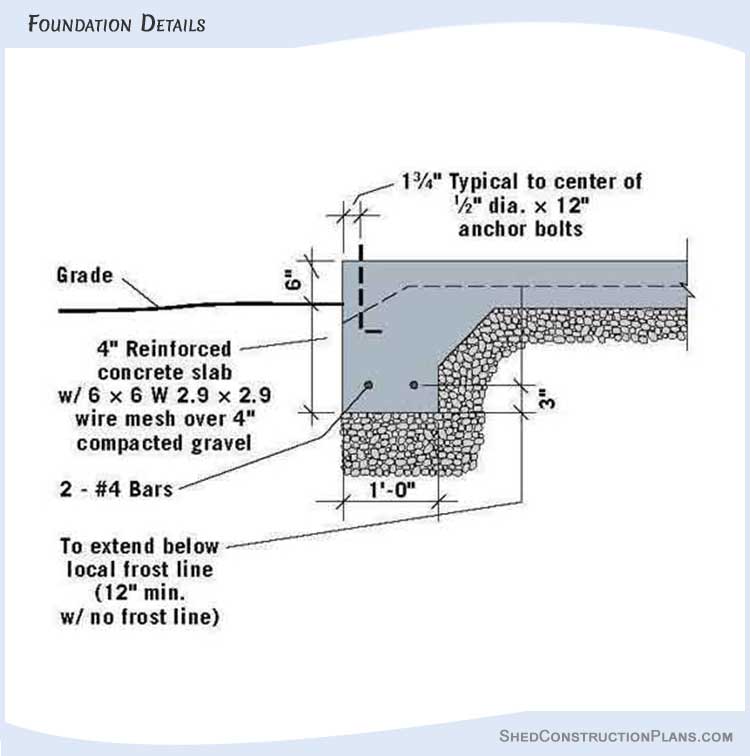
- Construct the concrete foundation as shown in the foundation detail diagram. Install fourteen J-bolts in the concrete as displayed in the foundation plan.
- Draw chalk lines on the foundation where the bottom plates will be install. Check that the lines are flush with the outer edge of the foundation. Frame the walls into panels as shown in the wall framing diagrams.
- Craft the bottom plates using pressure-treated lumber and fasten them to the studs using 16d galvanized nails. First, square the walls and then add the 1×4 bracing.
- Craft all walls on the floor first and then hoist and anchor them into the foundation J-bolts using nuts and washers. Build and raise the walls one by one and then fasten them together with double top plates.
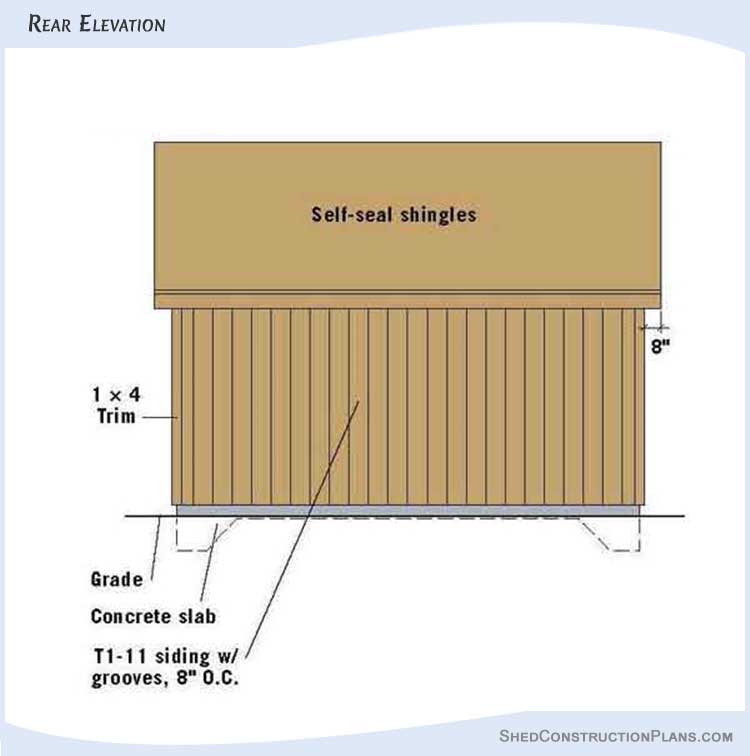
- Install siding on the outside of the wall frames.
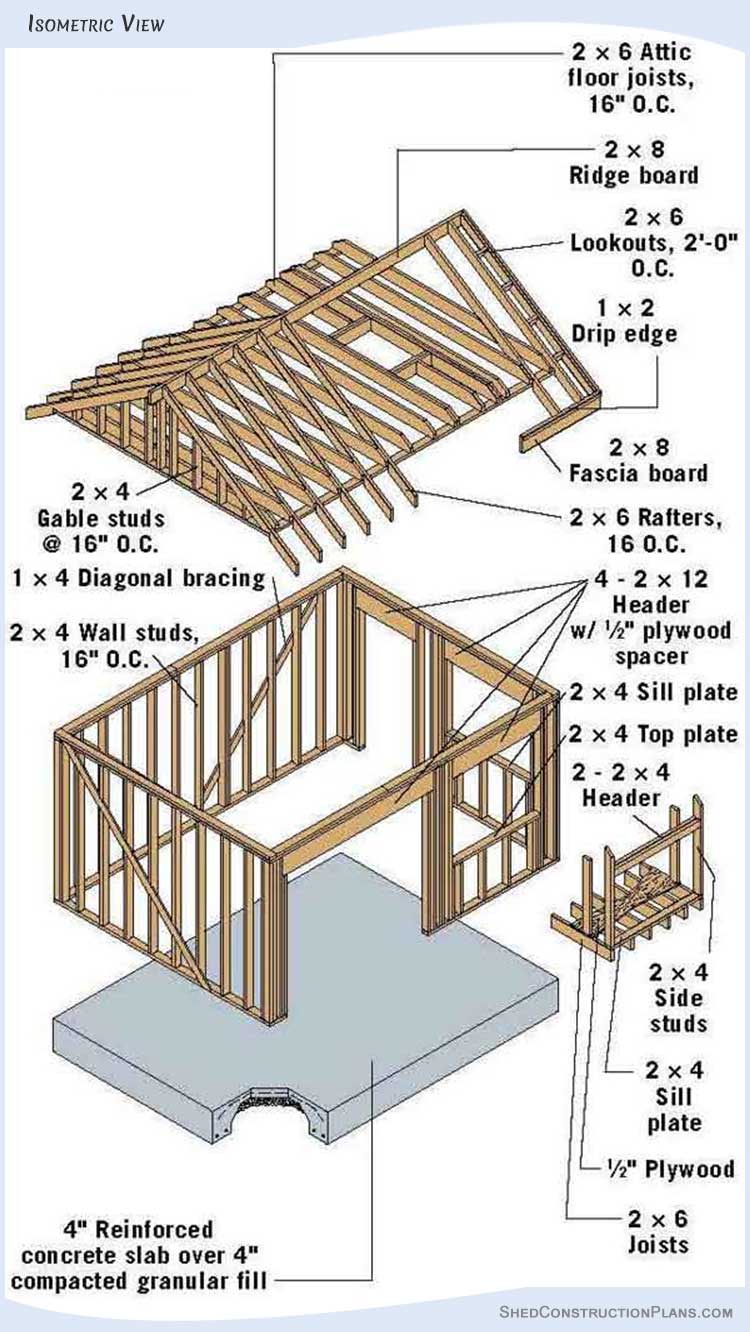
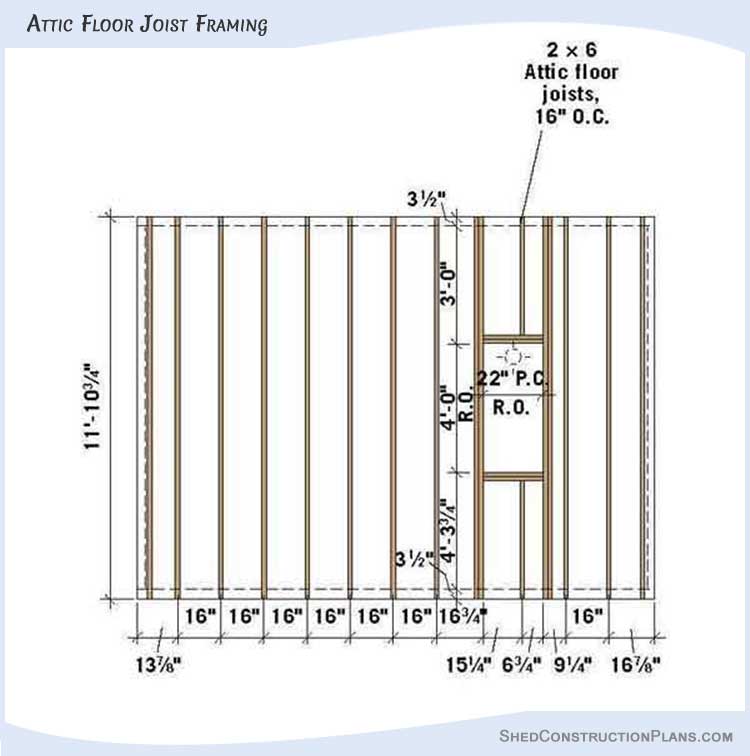
- Craft 15 floor joists using 2×6 lumber for building the loft floor. Clip the joist corners to prevent them from going beyond the rafters.
- Draw the layout of the joists over the wall plates as shown in the attic floor joist framing diagram. Fasten the joists with the plates at both ends using 8d nails.
- Construct the rough opening for the attic staircase using doubled headers and doubled side joists secured together with 10d nails.
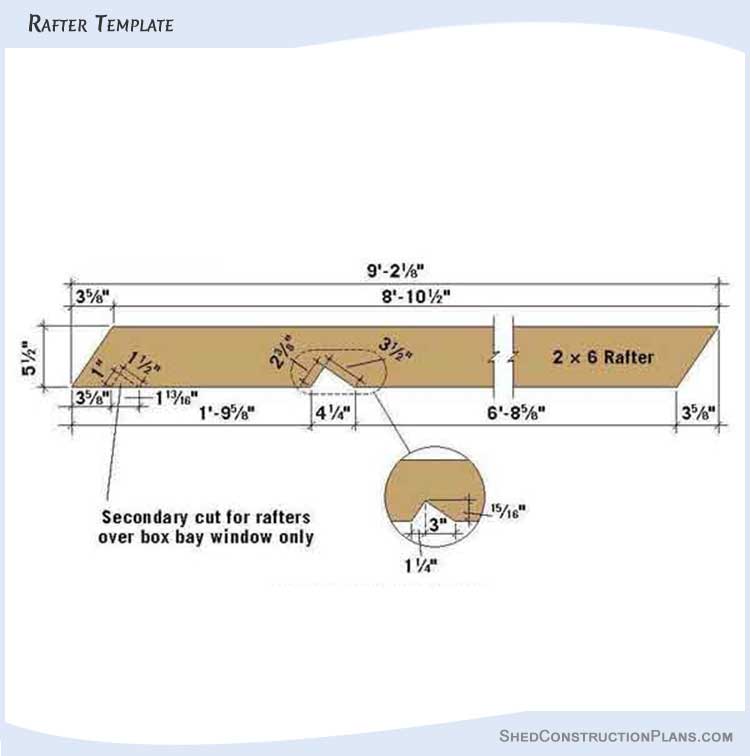
- Create the first two rafters using the rafter template diagram and check that they fit correctly. Saw and adjust their lengths as needed.
- Craft four special rafters, four gable overhang rafters, and twenty-four standard rafters. The overhang rafters won’t have any birdsmouth cuts. The special rafters will have an extra birdsmouth cut for the box bay.
- Draw the rafter layout on the wall and ridge plates as shown in the front and rear framing diagrams. Fasten the lookouts 24 inches O.C. and then secure the overhang rafters. Connect the rafters with the attic joists using 10d nails at both ends.
- Draw the layout of studs for the gable end walls over the wall plates as shown in the side framing diagram. Copy the layout on to the rafters with a level. Craft each stud using 2×4 lumber and miter the top ends at an angle of 33.5 degrees. Secure the studs perfectly aligned with the end walls.
- Build the half-wall for the inner apron under the boxy bay using 2×4 pressure-treated lumber. Create five studs and secure one stud at either end. Install the remaining studs spaced out evenly between the outer studs. Fasten the bottom plate of the half wall to the concrete slab with masonry screws.
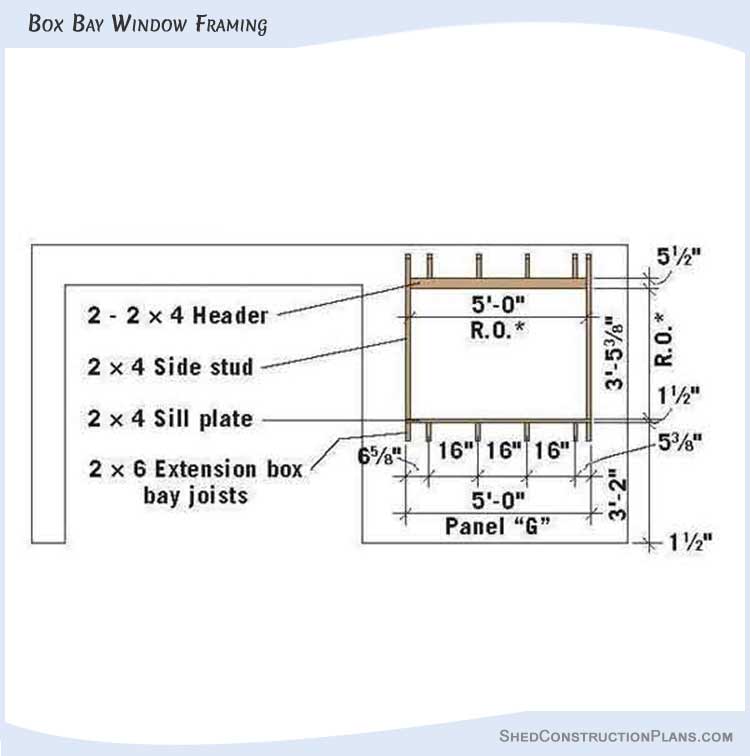
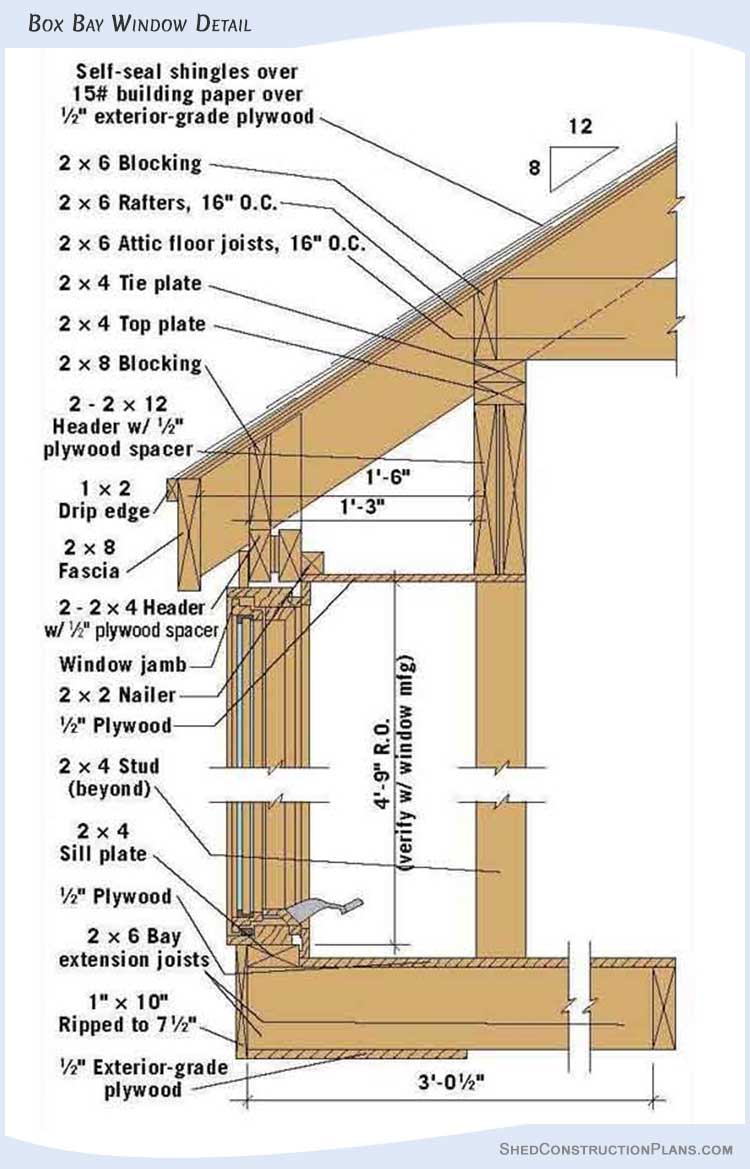
- To build the box bay window, cut 6 joists from 2×6 lumber and toenail them to the outer and inner half walls as shown in the framing diagram. Install a 5 feet long sill plate connecting the ends of the joists. Add two studs extending from the top edge of rafters to the sill plate. Secure a 2×4 header above the sill plate and between the side studs.
- The bottom and top of the bay will be covered with plywood, as displayed in the box bay window detail diagram. Create and install a stud made from 2×4 lumber between the plywood panels at both ends of the wall header.
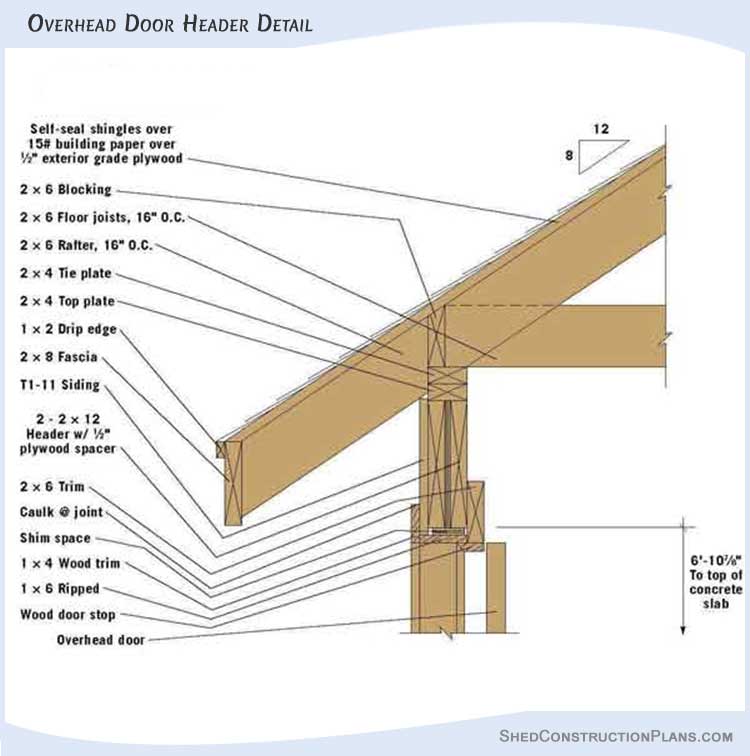
- Craft and install 2×6 timber blocks between the attic joists and rafters as shown in the overhead door header detail diagram. Use 2×8 blocks to seal the rafter bays over the box bay header.
- Secure 2×8 fascia along every eave such that its edge is flush with the roof sheathing. Install 1×8 fascia on the overhang rafters. Create a drip edge along the eaves using 1×2 trim.
- Install Z-flashing over the first siding row. Attach 1×4 trim to the flashing over the horizontal seam.
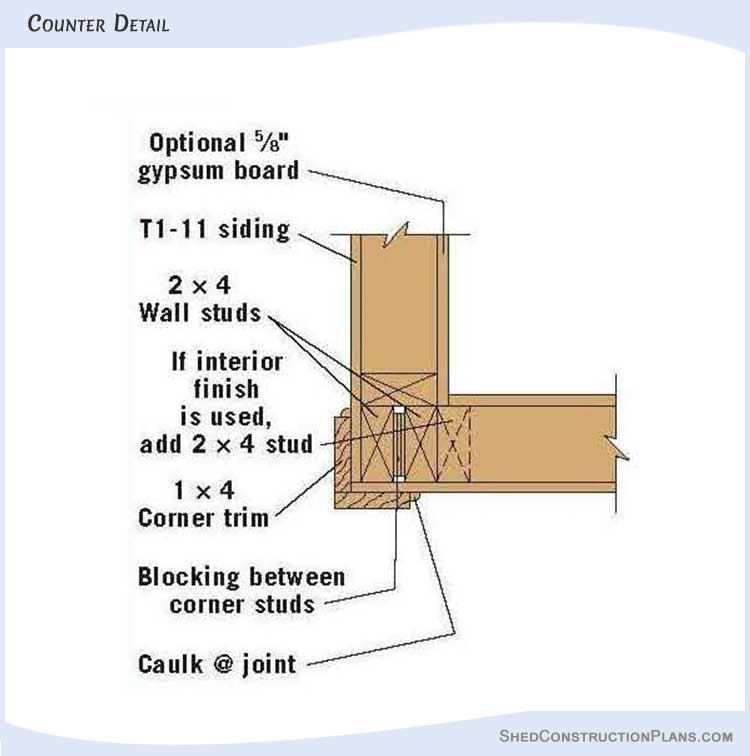
- Secure 1×4 trim over all the corners and around the doors and windows. Install 1×10 horizontal trim over the box bay bottom.
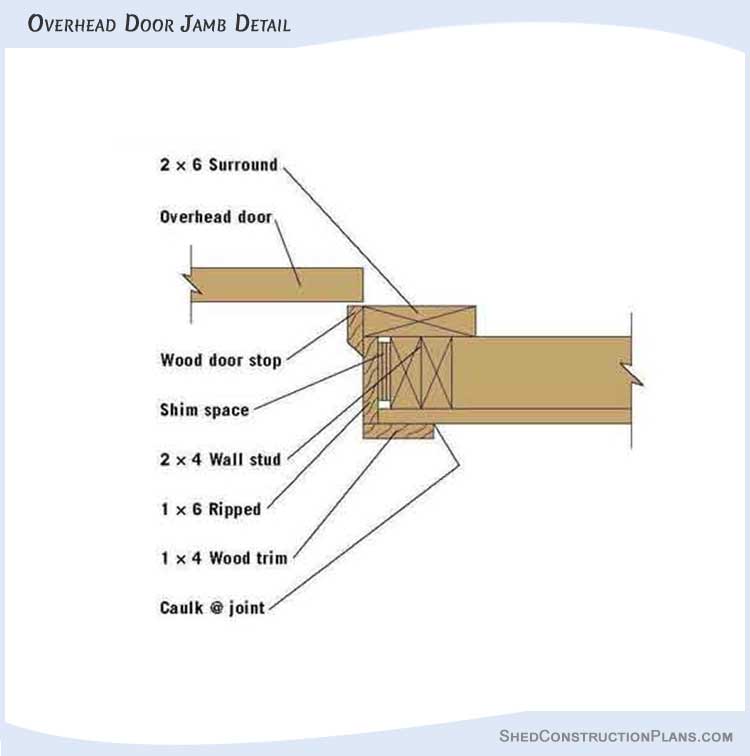
- Create and install door jambs using 1×6 timber. Verify that the jambs are aligned with the wall framing. Attach the 2×6 trim according to the overhead door header and jamb detail diagram.
- Attach the windows and doors and secure their jambs level with the siding. Install the stop molding over the side and top jambs as shown in the service door header diagram.
- Finally, install the roof sheathing, building paper, and roof shingles.
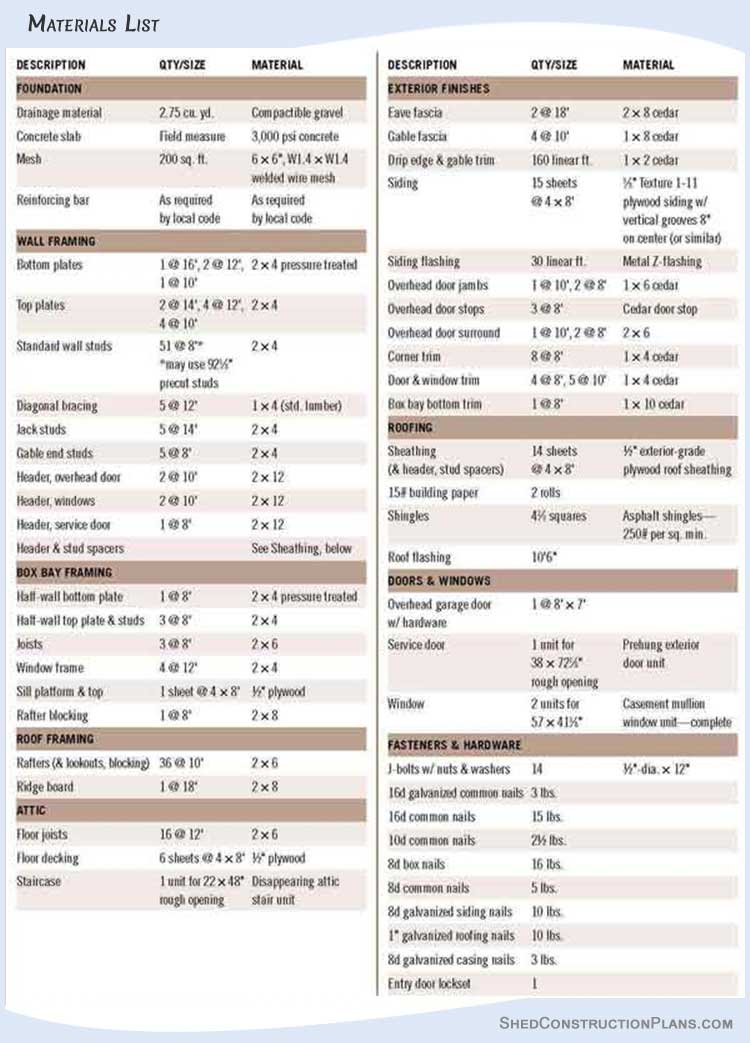
Materials List For Constructing 12×16 Shed With Loft