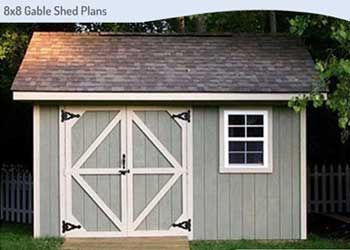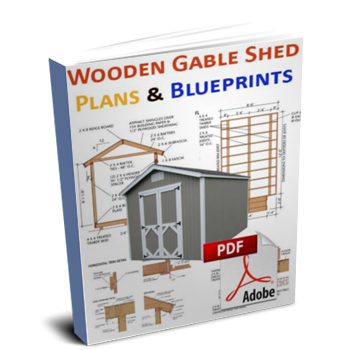
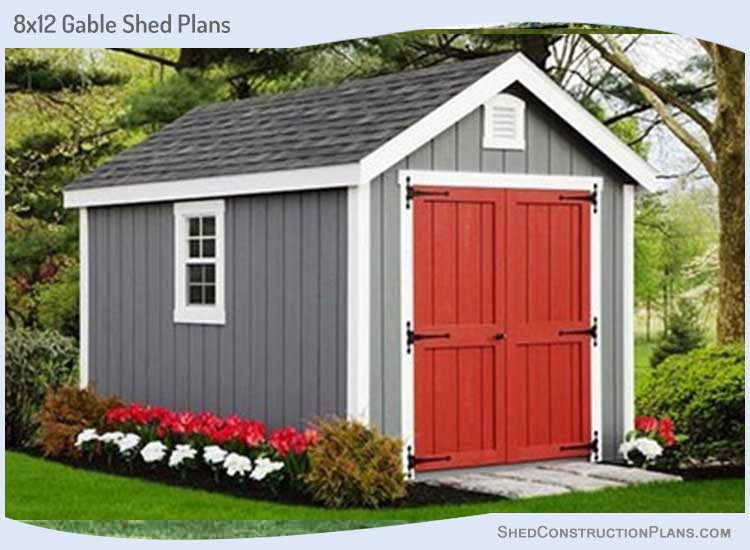
Here are some detailed 8×12 storage shed plans & blueprints for making a durable gable shed in your yard. These plans will help you make a simple and multipurpose storage shed on a low budget.
This shed can easily be used as a workshop, tool shed, garden shed or even as extra living space.
You only need basic building materials for finishing this DIY project. Complete floor and wall frame diagrams are included along with blueprints for constructing the roof.
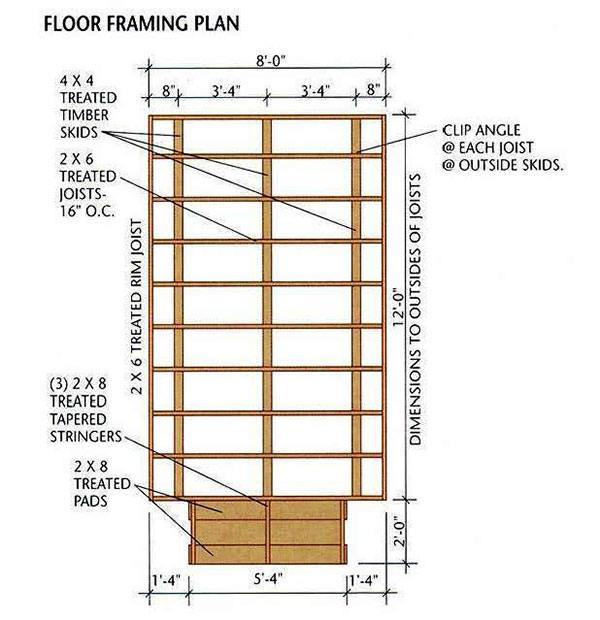
8×12 Storage Shed Plans For Constructing The Foundation & Floor Frame
- Dig a 5 inch deep ditch on the land where the foundation for the shed will be laid and fill it up with concrete to form a solid base for the shed.
- Level out the concrete with a roller and leave it to dry for a day.
- Take three 12 feet long pieces of pressure treated wood and make the skids for the shed floor.
- Use ten 93 inch joists and two 12 feet rim joists for framing the shed floor.
- Trace the location for the joists on the rim joists and then secure those using nails.
- Verify that the crowned border of the joists is facing upward.
- Place the frame for the shed floor over the skids and verify they are square by confirming the diagonal lengths.
- Attach metal angles to each joist across the skids on the outside with galvanized nails and then fasten each joist to the central skid.
- Secure the sheathing on the floor frame from one corner to other by driving nails at every 6 inches along the boundaries. Towards the center, you only need to drive one nail every 12 inches,
- Connect the outer skids and the joists with angles. Use galvanized nails for securing the skids and hanger nails for fastening the joists.
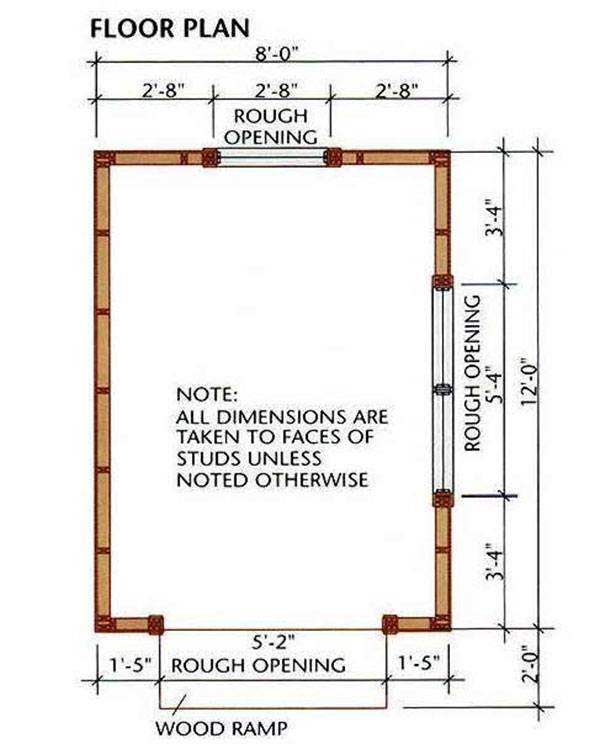
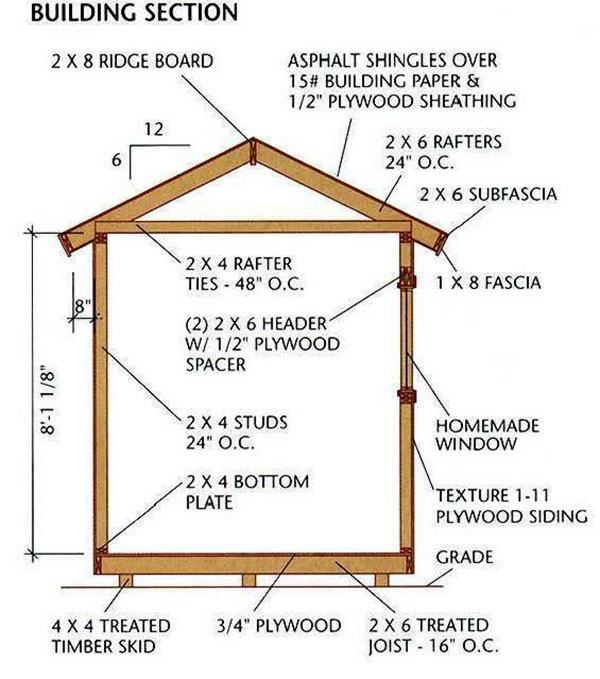
8×12 Storage Shed Blueprints For Making The Wall Frame

- Cut out four 89 inch plates for the front and back walls and four 12 feet long wall plates for the side walls..
- Draw the layout of the studs on the wall plates as shown in the 8×12 shed plans and blueprints.
- Create 27 studs that are 92 inches long and 6 jack studs that are 81 inches long.
- Construct 3 half inch thick 2×6 plywood headers.
- One should be 35 inches for the back window, second one of 67 inches for the right window and third one of 65 inches for the door opening.
- After the wall frames are complete, raise them and fasten them to each other at the corner studs.
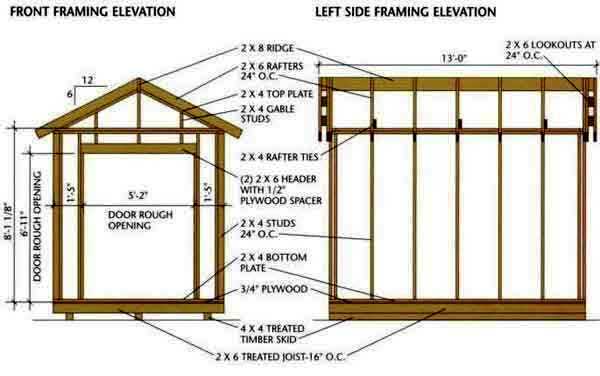
8×12 Shed Plans For Crafting The Roof Frame
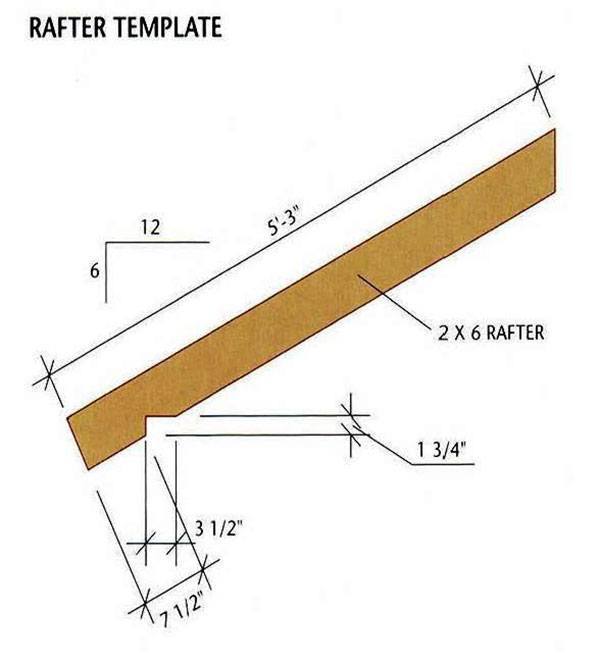

- Make to patter rafters by referring to the template rafter diagram.
- Check that these fit correctly with the help of a spacer block.
- Create twelve more rafters using the two template rafters.
- Build eight more rafters but without birds mouth cut for overhangs on the gable end
- Craft a 13 feet long ridge board using 2×8 timber.
- Trace the layout of the rafters over the ridge board and the top plates.
- Keep a distance of 16 inches between rafters.
- The outer edges of the outer rafters need to be at a 6 inch distance from the ridge board ends.
- Strengthen the bond between the rafters and the wall frame using metal anchors.
- Create three 8 feet long rafter ties and clip their top corners so they stay within the rafters.
- Setup each tie adjacent to a rafter pair as shown in the blueprints.
- Secure the faces of each end of a tie to the rafter using nails. Also nail the ends of the ties to the upper wall plate.
- Craft the gable wall plates long enough to fit between the wall plates and the ridge board,
- Fasten the gable plates such that their edges are parallel to the rafters.
- Build and attach the gable studs to the rafters as shown in the diagrams.
- Secure the lower side of each rafter with a metal anchor and fasten it to the wall plates.
Related:
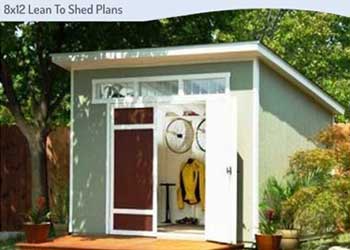
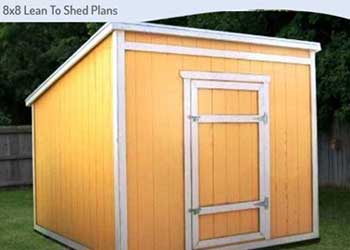
8×12 Lean To Shed Plans Blueprints
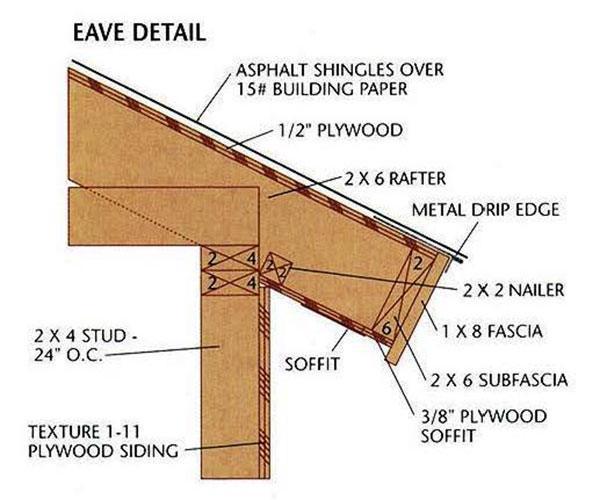
8×12 Garden Shed Plans For Installing the Fascia, Sheathing & Roofing
- Create and fasten the 2×6 subfascia on the eaves making sure that the ends remain parallel with the outer ends of the rafters that overhang.
- Nail the 1×8 fascia onto the gable overhangs and the eaves keep a half inch distance over the rafters such that it remains parallel with the sheathing.
- Fasten the 0.5 inch sheathing to the roof with nails beginning at a bottom roof corner of the roof. Keep a distance of 6 inches between two nails along the edges and a distance of 12 inches inside the field.
- Fix the eaves with metal drip edges and cover the sheathing with building paper.
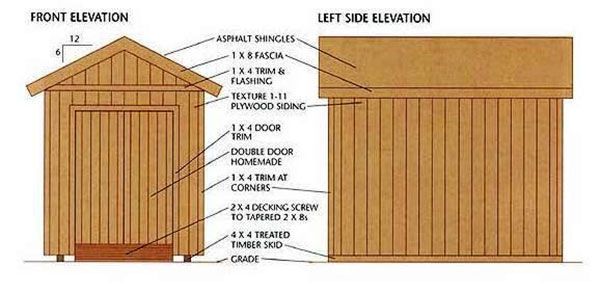
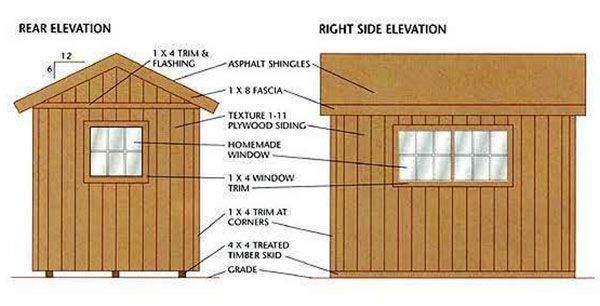
- Cover the roof with shingles beginning at the edge of the eaves.
Steps To Install the Soffits & Siding
- Create 12 nailers measuring them such that they fit between the rafters accurately.
- Secure the nailers between the rafters using toenails and facenails.
- Cut out soffit panels from plywood such that they accommodate between the fascia and wall frame.
- Nail the soffits to the rafters.
- Create openings for 4 soffit vents.
- Place one vent on the eaves, one on each of the side walls and two on the forward rafter bays.
- Setup the soffit vents.
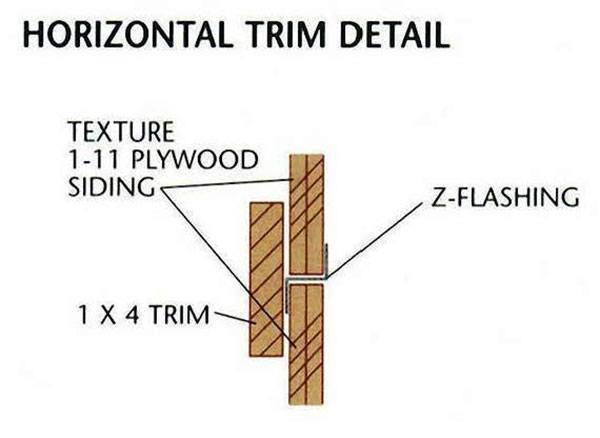
- Secure the siding using nails and butt the upper boundaries of the siding such that they touch the soffits.
- Attach Z flashing across the upper boundary of the siding and run the siding all the way up to the soffits.
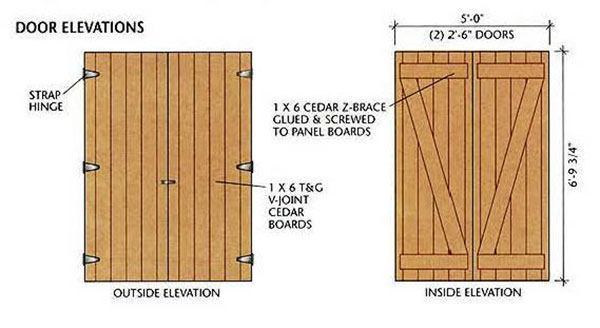
8×12 Gable Shed Plans For Constructing The Doors
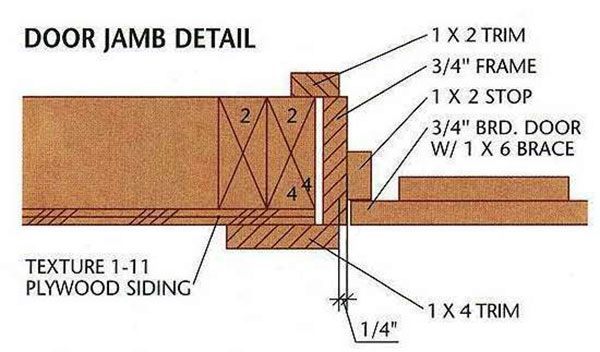
- Create the door frame using 0.75 x 4.5 inch cedar boards. Make the head jamb about 61 inches and the side jambs at 81 inches.
- Build the door frame by drilling through the head and side jambs and securing them with deck screws.
- Create and attach the door stops within the jambs using 1.25 inch screws or nails.
- Fasten the door frame to the wall using nails and shims taking care that the frame remains level and square.
- Create 81 inch long tongue and groove planks using 1×6 lumber for building the door.
- Build each door 30 inches wide by fastening six planks with each other. Use 2 boards at the ends as trimming.
- Attach Z braces to the doors using wooden screws and building adhesive after laying the doors flat on the ground.
- Connect the doors to the frame using strap hinges and hang the doors.
- Attach flashing over the door and nail the 1×4 trim to it.
- Check that the door is vertical and make fine adjustments using pointed shims until it is perfectly plumb.
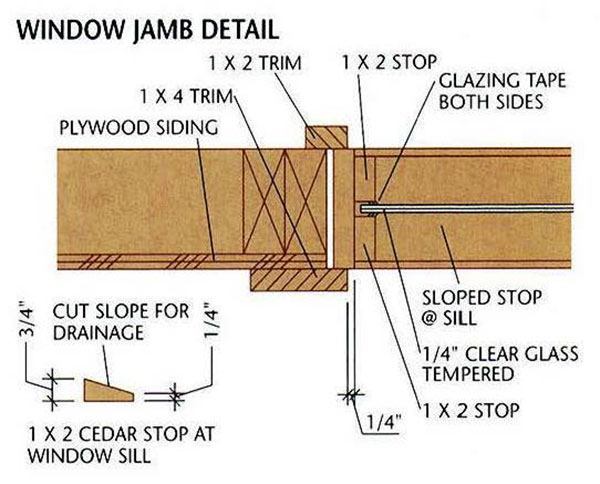
Make The Windows & Add The Trim
- Every window frame is created by making a rectangular frame using 0.75 x 4.25 timber.
- The lumber pieces are fastened to each other using deck screws taking care that the frame is slightly smaller than the opening for the window in the wall frame.
- Craft and attach a 2×4 mullion in the middle of the window frame within the side walls.
- Secure each window frame in its opening using galvanized nails making sure that the frame remains flush with the edges of the wall frame.
- Create and bevel all the window stops and nail them to the frame.
- Put the glass panes for the windows in place and cover the stops with glazing tape.
- Create the window trims and fasten these to the windows using screws or nails.
- Attach the corner trims adjacent to the horizontal trim such that it is touching the siding at its lower boundaries.
- Seal all spaces between the sidings and trim with waterproof filler on all doors and windows.
Build the Ramp

- Measure the height of the ground from the shed floor and calculate the slope and length of the ramp that would be most appropriate for your needs.
- Trace a line on the ground with chalk to highlight the length of the ramp that will be built.
- Create two pads according to the width of your ramp.
- Build tapered stringers that are around 2 inches shorter than the height of the shed floor from the ground.
- The length of the stringers can be determined using the marking on the ground you made earlier.
- Use 2×8 timber to construct the tapered stringers.
- Make at least 3 stringers, two for the sides and one for the center. Make additional stringers depending on the width of the ramp.
- Nail the pads with the stringers through their lower faces.
- Create the ramp decking using 2×4 timber and make sure you keep at least a distance of 0.1 inches between two boards. Calculate the number of boards needed.
- Nail the decking planks to the supports.
- Place the ramp next to the shed and secure it by nailing down the stringers to the ground.